How to List & Display Cloudinary Image Resources in a Gallery with Next.js & React
There are variety of services that let us upload an image and see the result, but what if we want to view all of the images we’ve uploaded over time or provide a custom dashboard for managing those the images?
Managing images on the web
Whether you’re a developer uploading images for your website or trying to create an app that allows others to upload images, being able to do something with those images after uploading them can be critical to our image management workflow.
But it’s not always as simple as giving your username and password to your Cloudinary account, as you need to make sure your visitors have the permissions needed to view or manage those images and maybe you’re generally trying to build a different type of experience for your app.
When managing our images with Cloudinary, we have API and SDK options that allow us to programmatically work with our media resources giving us powerful options for how we deliver those experiences.
What is Cloudinary?
Cloudinary is a media platform that excels in both the management and delivery of media assets. Once your images or videos are uploaded to Cloudinary, they’re backed by Cloudinary’s CDN in addition to their transformation API that allows you to gain more control over how you deliver your images such as automatically optimizing or resizing your media.
But uploading and delivering media isn’t the only part of the story, we want to be able to manage our media, which is where we can take advantage of the Cloudinary Admin API to gain programmatic access to our assets.
What are we going to build?
We’re going to start off with a demo starter that I created that gets us set up with a simple image gallery.
We’ll first see how we can use the Cloudinary Admin API to fetch all of our images to display on our page.
Then, because we have the option to manage our images in folders in side of Cloudinary, we’ll learn how we can show only the images in our root directory while then being able to dynamically display images from a specific folder.
Disclaimer: I work for Cloudinary as a Developer Experience Engineer.
Step 0: Creating a new Next.js app from a demo starter
We’re going to start off with a new Next.js app using a simple image gallery of some nice pictures.
Inside of your terminal, run:
yarn create next-app my-cloudinary-images -e https://github.com/colbyfayock/demo-image-list-starter
# or
npx create-next-app my-cloudinary-images -e https://github.com/colbyfayock/demo-image-list-starter
Note: feel free to use a different value than
my-cloudinary-imagesas your project name!
Once installation has finished, you can navigate to that directory and start up your development server:
cd my-cloudinary-images

yarn dev
# or
npm run dev
And once loaded, you should now be able to open up your new app at http://localhost:3000!

While we’ll be getting into more complex stuff later in this walkthrough, we’ll be starting off by working in src/pages/index.js which is our homepage, which is using local images currently stored inside of the repository.
As we’re working through, we’ll update our homepage to programmatically show the images from our Cloudinary account and then see how we enhance that experience with folder selection.
Step 1: Displaying all image resources from a Cloudinary account
To get started, we’re going to first show all image resources from our Cloudinary account.
We’ll do this by using the GET Resources endpoint with the Admin API inside of the getStaticProps data fetching method which will allow us to show our first set of results when the page loads.
At the bottom of our homepage inside src/pages/index.js let’s add:
export async function getStaticProps() {
  return {
    props: {

    }
  }
}
Next, we’ll want to create a new request that will reach out to our Resources endpoint. Inside of getStaticProps add:
const results = await fetch(`https://api.cloudinary.com/v1_1/${process.env.CLOUDINARY_CLOUD_NAME}/resources/image`, {
  headers: {
    Authorization: `Basic ${Buffer.from(process.env.CLOUDINARY_API_KEY + ':' + process.env.CLOUDINARY_API_SECRET).toString('base64')}`
  }
}).then(r => r.json());
Here notice a few things:
- We’re making a fetch request to the /resources/image endpoint which will only fetch images
- We’re dynamically passing in an environment variable to that endpoint for our Cloud Name which will allow us to tell Cloudinary which account to use
- We’re also including an Authorization header where we’re forming a string based on two additional environment variables, our API Key and API Secret, which will tell Cloudinary we have permission to make this request
- We’re chaining a
thenat the end to get the JSON from the response
Now in order to make those environment variables work, we’ll need to create an environment variable file.
In the root of the project create the file .env.local and add:
CLOUDINARY_CLOUD_NAME="[Your Cloudinary Cloud Name]"
CLOUDINARY_API_KEY="[Your Cloudinary API Key]"
CLOUDINARY_API_SECRET="[Your Cloudinary API Secret]"
You’ll want to be sure to fill out all of these values with your own Cloudinary configuration located inside of your Cloudinary dashboard to make sure you’re pulling from your account.

Now that our request should be working, let’s see what it looks like.
Let’s now add a console.log statement after our request:
console.log('results', results);Once saved, refresh your browser page, and instead of looking in your web console, we want to look in our terminal since we’re still technically working in node.

If you have a lot of resources, it will likely be a long list to scroll through, but you should see the image resources that are available in your account.
Note: this will show ALL image resources no matter what folder, which is why we’ll learn how to show only by folder later.
We have two things here that are important, the resources property and the next_cursor property. We’ll use resources which contains all of our images but we’ll use next_cursor in the a later step when we try to load more pages.
But with our request working, we could pass in the response “as is”, but instead we can optimize and only pass in the data we need to avoid overloading the page with data.
Add the following after the request:
const { resources } = results;

const images = resources.map(resource => {
  const { width, height } = resource;
  return {
    id: resource.asset_id,
    title: resource.public_id,
    image: resource.secure_url,
    width,
    height
  }
});
Here we’re destructuring our resources from the results, which contain all of our images, and then we’re mapping through all of the resources grabbing only the image data we need.
Now we can add our images to our props by adding it to the return statement:
return {
  props: {
    images
  }
}
And then making it available as a prop for our Home component:
export default function Home({ images }) {To test, let’s add a console.log so we can see all of our image data:
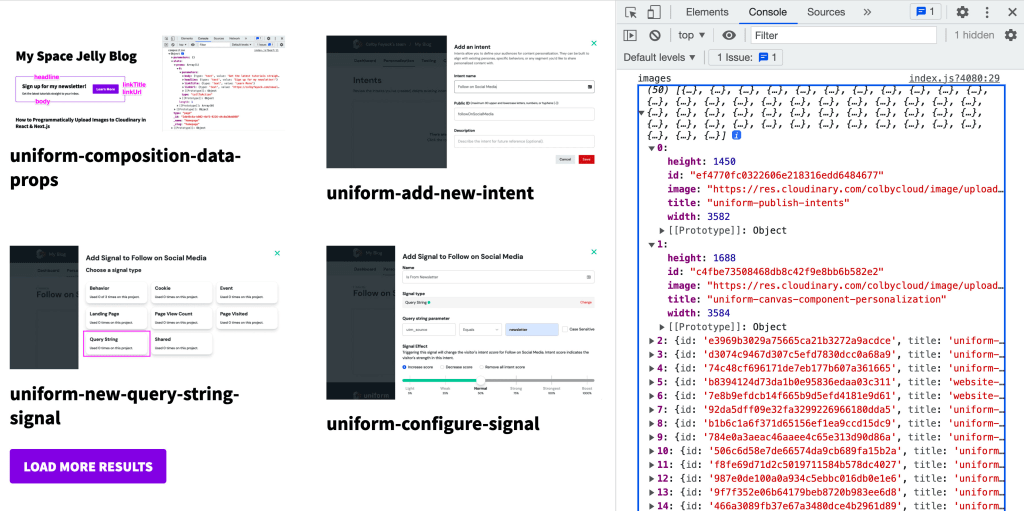
console.log('images', images);If you reload the app, you should already see the image results if you have images in your account. That’s because the images prop we added is in the immediate scope of our component as opposed to the imported images at the top.
Our new images work because we formatted our image data to match how our UI was displaying that data, which we can see in our terminal with our logged data:

Tip: to see how we’re actually displaying our images, check out the line that starts with
images.map!
But importantly, we’re now dynamically loading our images straight from Cloudinary!
Finally before we head to the next step, let’s clean up our images import statement at the top, so remove the following line:
import images from '@data/images';Next, we’ll learn how to show only the root images in our account as we begin to separate our images with the option to show images from a particular folder.
Step 2: Showing only image resources from the root folder in Cloudinary
In Step 1, we walked through showing all image resources, including all images in all folders.
But showing our images this way could make navigating or browsing for specific images difficult, so instead, we can improve the organization and first show only the images in the root directory, and later allow for the selection of a folder to show the images contained within.
We’re currently using the GET /resources/image endpoint, which is great for our Step 1 use case, but now we want to limit what folder we show.
To do this, we’re going to need to switch to the Resources Search endpoint which will allow us to specify exactly what results we want.
Inside of getStaticProps let’s update our fetch request to:
const results = await fetch(`https://api.cloudinary.com/v1_1/${process.env.CLOUDINARY_CLOUD_NAME}/resources/search`, {Here we’re basically swapping image to search.
If we reload the page, we should pretty much see the same thing, but now we unlock the capabilities of Search.
Particularly, we can now add parameters to the search URL which allow us to control our results.
For showing our root images, we want to show basically all images that don’t have a folder. We’ll use the expression parameter where we can specify folder="".
Above our request, let’s first create our parameter string:
const params = {
  expression: 'folder=""'
}
const paramString = Object.keys(params).map(key => `${key}=${encodeURIComponent(params[key])}`).join('&');
While this is a bit overkill for one parameter, we’ll be using multiple parameters later, so here we’re taking an object and using the Object.keys method along with map and join to create a string of our parameters.
Which we can the tack on to the end of our endpoint:
const results = await fetch(`https://api.cloudinary.com/v1_1/${process.env.CLOUDINARY_CLOUD_NAME}/resources/search?${paramString}`, {And now if we reload the page, we should only see images from the root directory, meaning, not inside a folder!

Step 3: Abstracting the search request and creating a serverless function to make search requests
Now before we take the next steps, we want to take a second to refactor a little bit.
In future steps, we’ll need to make a similar search request clientside for pagination and folder selection, which leaves us two problems:
- Simply having to repeat the same code
- We can’t use our API Key and API Secret clientside (we also shouldn’t because they’re secret)
To fix this, we can do two things. First, we’re going to abstract our search request into a function, which we can import and use in multiple places. Then we’ll additionally use that in to create a serverless function, which we’ll b able to safely use to make requests clientside.
First up, let’s abstract our search function.
Inside of the src directory, create a new folder called lib and inside, create a file called cloudinary.js.
Inside src/lib/cloudinary.js add:
export async function search(options = {}) {
  const params = {
    ...options
  }
  const paramString = Object.keys(params).map(key => `${key}=${encodeURIComponent(params[key])}`).join('&');

  const results = await fetch(`https://api.cloudinary.com/v1_1/${process.env.CLOUDINARY_CLOUD_NAME}/resources/search?${paramString}`, {
    headers: {
      Authorization: `Basic ${Buffer.from(process.env.CLOUDINARY_API_KEY + ':' + process.env.CLOUDINARY_API_SECRET).toString('base64')}`
    }
  }).then(r => r.json());

  return results;
}
In the above, we’re creating a new async function called search which we’re exporting. If you notice, the code inside is nearly identical to the code inside of getStaticProps, except one important distinction—we’re passing an object of options to the params instead of hard coding our expression.
This will give us the opportunity to pass in custom options for each request, such as specific folders or pagination.
So now that we have that ready, let’s use it in getStaticProps.
At the top of src/pages/index.js let’s first import our function with:
import { search } from '../lib/cloudinary';Then inside of getStaticProps, let’s replace our request logic with:
When reloading the page, everything should look exactly the same!
While we’re working inside getStaticProps, we have one more opportunity to abstract functionality. When we request resources, we’re always going to want to map our images the same way, whether in getStaticProps, or clientside, so let’s create a function that maps our image data for us.
Inside of src/lib/cloudinary.js add:
export function mapImageResources(resources) {
  return resources.map(resource => {
    const { width, height } = resource;
    return {
      id: resource.asset_id,
      title: resource.public_id,
      image: resource.secure_url,
      width,
      height
    }
  });
}
And like before, let’s first import that function:
import { search, mapImageResources } from '../lib/cloudinary';Then use it inside of getStaticProps:
const images = mapImageResources(resources);And again, if we reload the page, it should still be the same.
Now finally, let’s create a serverless function that will serve as an API endpoint that we’ll be able to use to create search requests.
This endpoint will specifically only be used clientside as we can’t make requests to our Next.js API endpoints inside of getStaticProps as it’s not available yet in the deployment pipeline.
So to get started, let’s create a new folder in the pages directory called api and inside create a new file called search.js.
Inside src/pages/api/search.js add:
import { search } from '../../lib/cloudinary';

export default async function handler(req, res) {
  const params = JSON.parse(req.body);

  const results = await search(params);

  res.status(200).json({ ...results });
}
Here we’re first importing our search function, we’re then creating our hander which inside we’re first parsing the body of the request into our parameters, then passing those to our search function much like inside getStaticProps, and finally passing those results back as the response.
There really isn’t too much to this function, it’s really serving as a proxy so that we can safely make this request with our secret environment variables.
We’ll use this for real in the next step, but if we want to test to see how this works, we can head back over to our homepage and add a quick clienside request.
Inside src/pages/index.js we can first see that we already have the useEffect hook imported from React, which we’ll use to make the request clientside.
Then inside of our Home component add:
useEffect(() => {
  (async function run() {
    const results = await fetch('/api/search', {
      method: 'POST',
      body: JSON.stringify({
        expression: `folder=""`
      })
    }).then(r => r.json());

    const { resources } = results;

    const images = mapImageResources(resources);

    console.log('images', images);
  })();
}, []);
Here we’re:
- Using useEffect to make our request when the page loads
- We make an asynchronous request to our API endpoint with the expression similar to before
- We map our results and log them to the console
If we refresh the page and look in the web console, we should now see an array of the exact same images we see on the page!

Now in practice, we won’t be making the same request, because we’re grabbing those first images from getStaticProps, but we can now use that endpoint to get the next page of results and later, folder-specific images!
Before moving on, feel free to remove the useEffect we just added.
Step 4: Adding a load more button to show more image results
When requesting our resources from Cloudinary, by default, we only get a limited amount. That’s intentional, as the more we try to load, the bigger and slower the request will be.
Instead, we use pagination to make another request to the next page of results as we need them.
To do this, we’ll add a Load More button at the bottom of the page which will allow us to keep browsing through our Cloudinary resources.
Note: if you don’t have more images in your Media Library available than the minimum in the request (currently 50 by default), this might not work, as it needs to be able to request additional pages. Try uploading a bunch of images to your Media Library and see how it works! You can always delete them later.
We’re going to do this in a few different steps:
- Expose our pagination “cursor”
- Set up a button to trigger loading more results
- Add the request logic to make a request to the next page
If we remember in Step 1, part of our response included a property called next_cursor which basically translates to the ID that we’ll use to get the next page of results, so we’ll first want to expose that in our application.
First let’s destructure that property from our response.
Inside of src/pages/index.js let’s update our results in getStaticProps to:
const { resources, next_cursor: nextCursor } = results;Note: I like to keep the same code style throughout all of my code, so I’m renaming the
next_cursorproperty tonextCursor
Then return it with our props:
return {
  props: {
    images,
    nextCursor
  }
}
And finally, we want to update our props to include nextCursor so we can use it in our app:
export default function Home({ images, nextCursor }) {Before we jump into our request logic, let’s first add our button which will help us trigger our request.
Under our <ul> that includes our image map, add:
<p>
  <Button onClick={handleOnLoadMore}>Load More Results</Button>
</p>
Note: if you’re following along with my starter, Button should already be imported, otherwise you can use a standard HTML
<button>
And before our component’s return statement we want to add our handleOnLoadMore function:
async function handleOnLoadMore(e) {
  e.preventDefault();

  const results = await fetch('/api/search', {
    method: 'POST',
    body: JSON.stringify({
      expression: `folder=""`,
      nextCursor
    })
  }).then(r => r.json());

  const { resources } = results;

  const images = mapImageResources(resources);

  console.log('images', images);
}
If you notice, this code is very similar to the useEffect we added in the previous step, however, we’re adding our nextCursor value as a parameter which we’ll pass in to the search request.
Now before this works, we need to also correct our code style change. We could do this inside of our serverless function, but if we instead do this to our abstracted search function, it will work where ever we use it.
So inside of src/lib/cloudinary.js add the following under params and above paramString:
if ( options.nextCursor ) {
  params.next_cursor = options.nextCursor
  delete params.nextCursor;
}
Here we’re checking if we have nextCursor and if we do, we’re updating our params for the request and deleting the old one to clean things up.
Note: again this is optional if you’re not updating the code style like I am, it’s absolutely personal preference, but it’s helpful to know what to expect a code style to be when working in an application!
But now, if we reload our app, scroll to the very bottom, and click Load More Results, we should see in our web console our next set of images!
To actually use these results, we can take advantage of React state to both store the current cursor and stack our results to see them all.
If we look at the top of our src/pages/index.js file, we already have useState imported, so we can get started right away.
Inside the top of the Home component add:
const [images, setImages] = useState(defaultImages);
const [nextCursor, setNextCursor] = useState(defaultNextCursor)
Here we’re creating new state for our images and our cursor.
If you notice though, were both using the same names for our state as our props and we’re additionally passing in new variables with the word “default” in front.
In order to clarify what’s coming from our getStaticProps method and what’s our current state, we can rename our props to be our “default” versions.
So let’s also rename our props:
export default function Home({ images: defaultImages, nextCursor: defaultNextCursor }) {Finally, let’s update our state after the request finishes.
Inside the handleOnLoadMore function first update our results destructuring statement to:
const { resources, next_cursor: nextPageCursor } = results;Note: be sure to rename the
nextCursorvalue to something other thannextCursorotherwise it will conflict with the scope of the state and not work properly, hence usingnextPageCursor
Then at the bottom add:
setImages(prev => {
  return [
    ...prev,
    ...images
  ]
});
setNextCursor(nextPageCursor);
Here we’re updating our state where with the images, we’re combining both our previous images with our new images, but we simply pass in the cursor value for the nextCursor.
But now, if we refresh the page, scroll to the bottom, and click Load More Results, we can see that we automatically load in the next set of images!
Now as one last step, we probably don’t want to show the Load More Results button if we don’t have more results to load, so let’s quickly fix that.
Inside of getStaticProps, let’s destructure the total_count property:
const { resources, next_cursor: nextCursor, total_count: totalCount } = results;And return in our props:
return {
  props: {
    images,
    nextCursor,
    totalCount
  }
}
And make it available as a prop:
export default function Home({ images: defaultImages, nextCursor: defaultNextCursor, totalCount: defaultTotalCount }) {As well as make it part of a state so we can update it on future requests:
const [totalCount, setTotalCount] = useState(defaultTotalCount)Where then, we can wrap our Load More Results button to make sure it only shows if we have less results than the total count:
{totalCount > images.length && (
  <p>
    <Button onClick={handleOnLoadMore}>Load More Results</Button>
  </p>
)}
Finally let’s make sure to update that whenever we get our next page of results.
Inside of handleOnLoadMore first destructure from the results:
const { resources, next_cursor: nextPageCursor, total_count: updatedTotalCount } = results;And update with that value:
setTotalCount(updatedTotalCount);And now if we have less than one page of results or if we hit the end of our results, we should not see a Load More Results button!

Step 5: Showing root folders and displaying images from the folder
As we know from previous steps, we’re only showing the images in the root directory, but of course that’s not all of the images we have, we have folders with a lot more!
To fix this we’ll first display all of the root folders in our library then, use React state to store allow our visitors to select a folder, then update our image request to match that folder.
Starting off, let’s first get our list of folders.
We can start off by abstracting this function like we did our search request just so we have the ability to use it in the future.
Inside src/lib/cloudinary.js add:
export async function getFolders(options = {}) {
  const response = await fetch(`https://api.cloudinary.com/v1_1/${process.env.CLOUDINARY_CLOUD_NAME}/folders`, {
    headers: {
      Authorization: `Basic ${Buffer.from(process.env.CLOUDINARY_API_KEY + ':' + process.env.CLOUDINARY_API_SECRET).toString('base64')}`
    }
  }).then(r => r.json());

  return response;
}
Here we’re creating a function that makes a request to the Cloudinary folders endpoint.
Next, let’s go back to our homepage and use this function.
Inside src/pages/index.js, at the top let’s import our function:
import { search, mapImageResources, getFolders } from '../lib/cloudinary';Then inside of getStaticProps add:
const { folders } = await getFolders();And return the folders value to our props:
return {
  props: {
    images,
    nextCursor,
    totalCount,
    folders
  }
}
Then we can make that value available as a prop and immediately log it to see what’s inside:
export default function Home({ images: defaultImages, nextCursor: defaultNextCursor, totalCount: defaultTotalCount, folders }) {
  console.log('folders', folders);
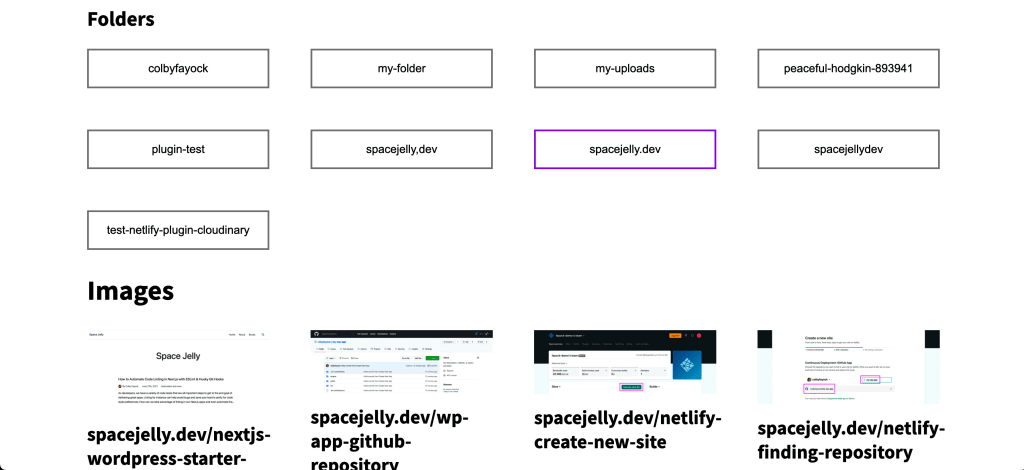
We can see all of our folder names and the path used to access them!
Now let’s display them on the page.
Above our list of Images add:
<h2>Folders</h2>

<ul className={styles.folders}>
  {folders.map(folder => {
    return (
      <li key={folder.path}>
        <button data-folder-path={folder.path} >{ folder.name }</button>
      </li>
    )
  })}
</ul>
Here we’re mapping through our folders and applying a preset style that I included in the starter. We’re a data attribute for our folder path to make it easier to grab later.
And at the top of the page, we should see that same list of folders.

Now let’s allow someone to select one of those folders to select an “active” folder.
First let’s create our state:
const [activeFolder, setActiveFolder] = useState();Then add an onClick function handler:
function handleOnFolderClick(e) {
  const folderPath = e.target.dataset.folderPath;
  setActiveFolder(folderPath)
  setNextCursor(undefined);
  setImages([]);
  setTotalCount(0);
}
Where we’re grabbing that data attribute with our folder path and using it to set the active folder value, clear the next cursor, clear our images to prepare for our new request, and setting the total count to.
To use our onClick handler, we’re going to apply it to the <ul> to avoid having a new click handler for every button. In our function, that’s why we’re using the e.target instead of the currentTarget.
Update the folders <ul> to:
<ul className={styles.folders} onClick={handleOnFolderClick}>And as an extra touch, I included the ability to highlight which one is active right in the UI.
To add this, inside of our folders.map statement to:
{folders.map(folder => {
  const isActive = folder.path === activeFolder;
  return (
    <li key={folder.path} data-active-folder={isActive}>
      <button data-folder-path={folder.path} >{ folder.name }</button>
    </li>
  )
})}
We can see we added the isActive constant and using it as a data attribute.
When we reload the page, we should still see our default images, but if we select a folder, we should now see it highlighted and “active”. But we’re currently not using it to fetch the new images, which is why it shows no images at all.
To update our images, we can use a useEffect hook, so that any time our activeFolder value changes, we can make a new request for the new images.
Under our existing functions inside of src/pages/index.js add:
useEffect(() => {
  (async function run() {

  })();
}, [activeFolder]);
This is going to allow us to run a new asynchronous request any time our active folder changes.
Now inside, we can pretty much copy the contents of our handleOnLoadMore function:
useEffect(() => {
  (async function run() {
    const results = await fetch('/api/search', {
      method: 'POST',
      body: JSON.stringify({
        expression: `folder="${activeFolder || ''}"`
      })
    }).then(r => r.json());

    const { resources, next_cursor: nextPageCursor, total_count: updatedTotalCount } = results;

    const images = mapImageResources(resources);

    setImages(images);
    setNextCursor(nextPageCursor);
    setTotalCount(updatedTotalCount);
  })();
}, [activeFolder]);
With a few important differences:
- Because we’re changing folder, we want to specify that folder in our expression and if it doesn’t exist, pass in an empty string
- We also want to remove the
nextCursoras we’re starting from the first page - Finally we want to overwrite all images in our state, so we just set our
imagesas is
But now if you reload the page, we should still see our first page of results, but if we select a folder, we should see the images update to the contents of that folder!
What else can we do?
Add your video content!
Also have videos in your library? Add those to your gallery as well!
The Cloudinary Admin API supports all types of media supported by Cloudinary itself.
Allow uploads to the Cloudinary cloud
Displaying images from Cloudinary is one thing, but how about getting images there in the first place?
Add an upload form that allows you or your visitors to upload directory to the active account.
How to Programmatically Upload Images to Cloudinary in React & Next.js
Add a copy to clipboard link
Set up a little button on each resources that allows the visitor to copy the URL to the Cloudinary image to their clipboard, making it easy to grab-and-go with whatever image needed.