How to Make Twitter API Requests with NextAuth.js Session Tokens
NextAuth.js makes adding authentication with providers like Twitter easy, but that doesn’t mean we automatically have access to use those providers’ APIs. How can we take advantage of the active session to interact with APIs like Twitter’s?
What is NextAuth.js?
NextAuth.js is an all-in-one solution for adding authentication to a Next.js application.
If you followed along with my previous tutorial How to Authenticate Next.js Apps with Twitter & NextAuth.js, we learned how we can use it to allow visitors to our applications to log in and authenticate so we can validate they’re who they say they are.
Note: we’re going to start off from that last tutorial, so if this is your first time using NextAuth.js, it might be a good idea to follow along there first!
How can we use the Twitter API with NextAuth.js?
The cool thing about NextAuth.js is it makes logging in to 3rd party providers pretty easy. Because Twitter is one of those, we can allow our visitors to log into their own Twitter account where we can then use that authenticated session to interact with the Twitter API.
That means, we can do things like allow our visitors to compose tweets, make search requests, and even update their profile.
What are we going to build?
We’re going to pick up where we left off at the end of my NextAuth.js introduction tutorial where were able to allow people to log in to our application with Twitter.
Because we allowed them to log in with twitter, we can now take advantage of the Twitter API, using it to make requests straight to Twitter for getting information and interacting with Twitter itself.
To do that, we’ll need to update what information NextAuth stores when creating a session so that we can obtain the Twitter auth tokens, then use those values inside of a serverless function to make our requests.
If you followed along with the last tutorial, you can feel free to skip Step 0, otherwise, the first thing we’ll do is create a new application using the exact code from that walkthrough.
Step 0: Creating a new NextAuth.js authenticated Next.js app
We’re going to start off with an existing application that has NextAuth.js installed.
To do that, we’re going to use the demo from my previous NextAuth.js tutorial.
yarn create next-app my-nextauth-twitter -e https://github.com/colbyfayock/my-auth-app
# or
npx create-next-app my-nextauth-twitter -e https://github.com/colbyfayock/my-auth-app
This will create a new project inside of the directory my-nextauth-twitter. Feel free to update that value to whatever you’d like to name this project.
Next, navigate to that directory:
cd my-nextauth-twitterBefore we start up our server, we need to add environment variables so that we can give NextAuth permission to interact with Twitter.
Inside the root of the project, create a new file .env.local and add the following:
TWITTER_CONSUMER_KEY="[Your Twitter API Key]"
TWITTER_CONSUMER_SECRET="[Your Twitter API Secret]"
NEXTAUTH_URL="http://localhost:3000/"
The Twitter keys will come from you creating a new app inside of the Twitter Developer portal. While I won’t go through how to do that here, you can find step by step instructions over at my last tutorial.
The NEXTAUTH_URL value will be wherever the application will be available. As we develop locally, you’ll want to use http://localhost:3000, but when deployed, you would use the URL your application is available at.
But now, you can start up the development server:
yarn dev
# or
npx run dev
Where you’ll see a simple new application that has a login link and if you click it and follow the prompts to log into your Twitter account, we’ll have a new authenticated session!

Step 1: Accessing Twitter oAuth tokens in a NextAuth.js session
By default, NextAuth.js doesn’t expose oAuth tokens when accessing a session via a 3rd party provider. This helps to prevent accidental leakage when dealing with sensitive values that could be used to compromise someone’s account.
So to start, we want to make those tokens accessible so that we can then use them to make requests to the Twitter API.
In NextAuth.js, we can define callbacks which allow us to tap into the authentication events and customize what gets returned.
To start, open up /pages/api/auth/[...nextauth].js and add the following to the top level configuration object:
export default NextAuth({
  ...
  callbacks: {
    async jwt(token, user, account = {}, profile, isNewUser) {
      if ( account.provider && !token[account.provider] ) {
        token[account.provider] = {};
      }

      if ( account.accessToken ) {
        token[account.provider].accessToken = account.accessToken;
      }

      if ( account.refreshToken ) {
        token[account.provider].refreshToken = account.refreshToken;
      }

      return token;
    },
  }
});
Here, we’re telling NextAuth that when we return our token object from the jwt function, we also want to include the account’s Access Token and Refresh Token.
Tip: learn more about what JWT means and stands for at jwt.io.
Particularly, we want to store those tokens with the provider that we’re working with. While we’re only going to be working with Twitter in our instance, we want to make sure we avoid any collisions with different authenticated sessions.
With the code above, we won’t immediately be able to see anything actually happen, as the data that we currently have available in the client is the session which does not include those tokens.
Note: Keep in mind, we don’t want to expose the tokens on the session as it could lead to security issues.
But next, we’ll learn how we can access those values inside of a serverless function where we can use those tokens to make requests to the Twitter API.
Step 2: Creating a new API endpoint to access a NextAuth.js authenticated Twitter session
In order to make requests on behalf of our logged in visitor to the Twitter API, we’re going to create a serverless function that uses the session’s tokens to make that request and return it back to our application.
To do this, we’re going to start off with creating the base for our search endpoint.
Back in our code, first create a new folder under pages/api called twitter and inside that create a new file called search.js.
Inside pages/api/twitter/search.js add:
export default async (req, res) => {
  try {
    return res.status(200).json({
      status: 'Ok',
      data: []
    });
  } catch(e) {
    return res.status(400).json({
      status: e.message
    });
  }
}
In the above, we’re defining an asynchronous function that will serve as our serverless function handler.
Inside, we’re preparing a try/catch block in order to manage our API endpoint’s responses so that we can either return our search data or return an error if we receive one.
Once we save this, we should be able to access this directly in our browser by visiting http://localhost:3000/api/twitter/search.
{"status":"Ok","data":[]}We can see that we’re getting a response of “Ok” along with an empty array. From here, we’ll start finding our user’s session and using it to make a request!
To start, we want to grab both our visitor’s session as well as their tokens that we attached in Step 1. We can use the getSession and getToken methods provided by NextAuth.js to help us do that.
At the top of our search.js file, add:
import { getSession } from 'next-auth/client'
import { getToken } from 'next-auth/jwt';
Then at the top of the async function we defined, add:
const session = await getSession({ req });
const token = await getToken({ req });
While we won’t be able to see any of the information contained in those values when accessing the endpoint in the browser, if we add console logs, refresh the page in the browser, then look at our terminal, we should be able to see what’s inside.
const session = await getSession({ req });
const token = await getToken({ req });

console.log('session', session);
console.log('token', token);
Currently we get nothing! It’s because we don’t have an active session available to access that information.
Now, if before hitting the endpoint in your browser you logged in with Twitter, you might have notice that not only do you not see those console log statements, we get an internal sever error!
When using the getToken with an active session, NextAuth.js requires us to use their App Secret option. It’s essentially a random string that we’ll use to communicate with NextAuth.js to make sure we are who we say we are.
To start, back inside of pages/api/auth/[...nextauth].js we need to add a new property after our callbacks.
Instead of supplying a string directly to this property, we’re going to use an environment variable as we don’t want to store sensitive values like that in our code.
export default NextAuth({
  ...
  secret: process.env.NEXTAUTH_SECRET
});
That means, inside of .env.local, we want to define that value:
NEXTAUTH_SECRET="mySecretValue"Note: make sure to update this value to your own custom string. You can generate a randomized value like you would with a secure password!
Now back inside of our search API in pages/api/twitter/search.js, we can use our secret. Update the token constant statement to:
const token = await getToken({
  req,
  secret: process.env.NEXTAUTH_SECRET
});
Before we see if this works, make sure to restart your development server, as any time we make changes to environment variables, we need to restart the process.
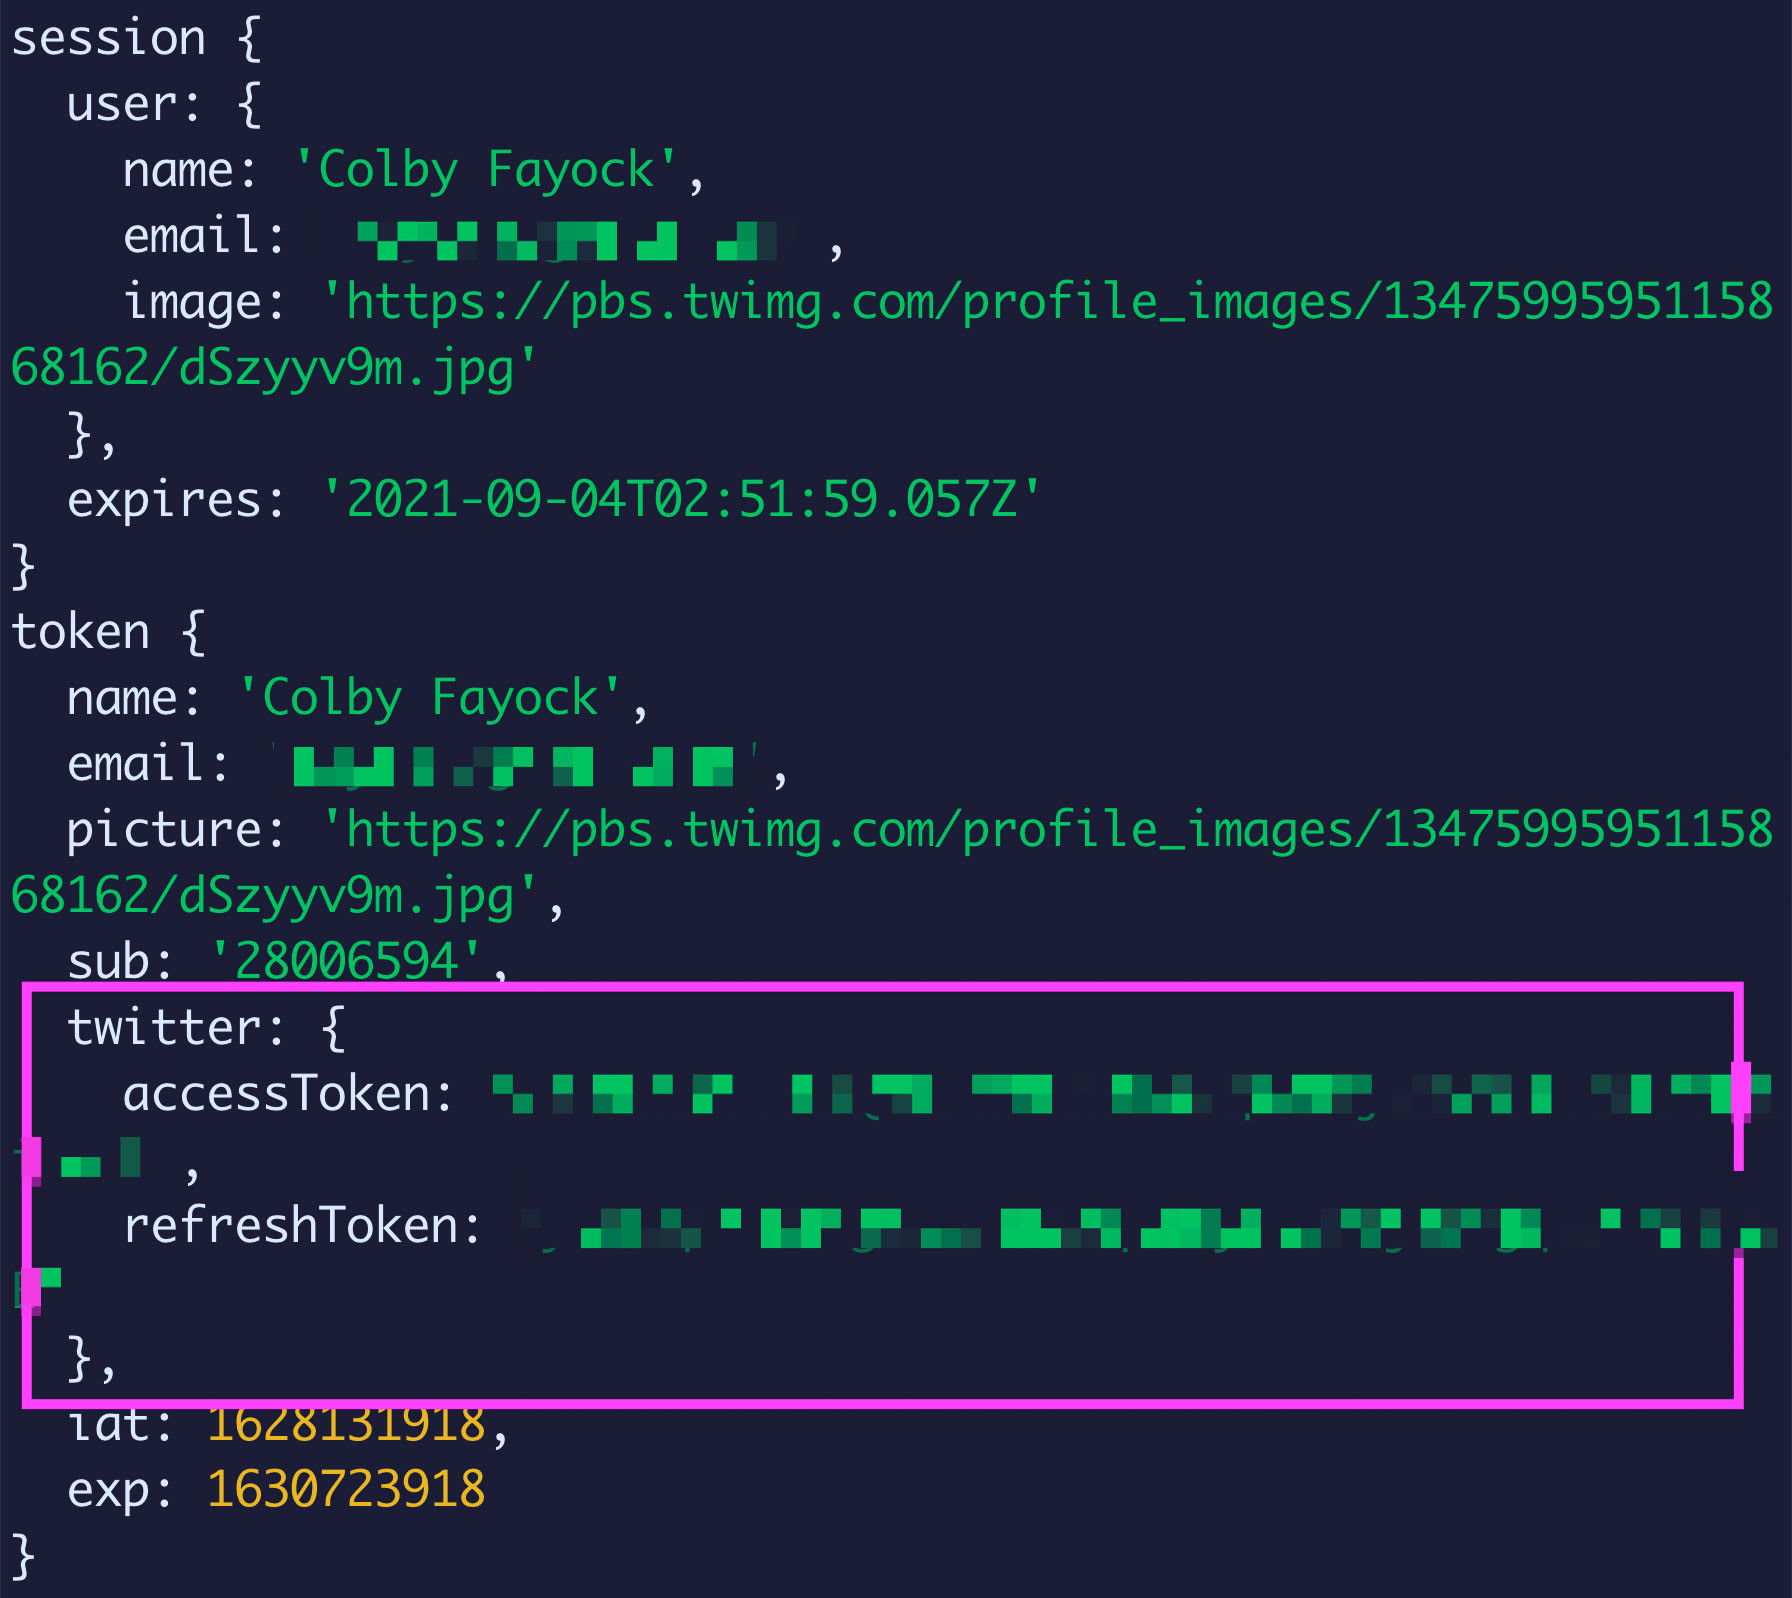
But now, if you log in to your Twitter account from the application then refresh the endpoint in the browser, we should now see our tokens and session in our terminal!
Step 3: Making a search request to the Twitter API using a NextAuth.js authenticated session
Before we get started working with the Twitter API, let’s take a step back into our React application quick.
In order to actually use our search endpoint, we’re going to want to send a query to that endpoint and see those results. While we could use a tool like Postman to test that, let’s add a quick search UI to our application.
To start, we’re going to use React state to manage our search results. At the top of pages/index.js import React’s useState:
import { useState } from 'react';Next, add the following above the component return statement:
const [statuses, setStatuses] = useState();

async function handleOnSearchSubmit(e) {
  e.preventDefault();

  const formData = new FormData(e.currentTarget);
  const query = formData.get('query');

  const results = await fetch('/api/twitter/search', {
    method: 'POST',
    body: JSON.stringify({
      query
    })
  }).then(res => res.json());

  setStatuses(results.data);
}
Then, somewhere inside of the component return statement, add the following:
<form onSubmit={handleOnSearchSubmit}>
  <h2>Search</h2>
  <input type="search" name="query" />
  <button>Search</button>
</form>

{statuses && (
  <ul>
    { statuses.map(({ id, text, user }) => {
      return (
        <li key={id}>
          <p>{ text }</p>
          <p>By { user.name } ({ user.screen_name })</p>
        </li>
      );
    })}
  </ul>
)}
Note: if you want to follow along, I’m replacing the content inside of the grid
divwith our new form.
In these several snippets of code, we’re:
- Creating a new React state which we’ll use to store our search results
- We’re creating a function that will trigger any time we submit a form
- In that function, we’re first using our form to grab the query form field value
- With that value, we make a request to our endpoint by sending a payload with our query value
- When that request finishes, we set our results React state
- And finally we added a form that will allow us to trigger a search request and display a list of our results

At this point, if we try to submit the form, nothing will happen, as we’re not using the value, so let’s head back to the app and do something with it.
To start, let’s grab that query value.
Back inside of pages/api/twitter/search.js at the top of the function add:
const body = JSON.parse(req.body);
const { query } = body;
Here, we’re attempting to parse the body that we’re sending to the endpoint so that we can read it as JSON, where once we have it as an object, we can destructure our query value.
If we add a console log below and try to submit a search test again:
console.log(query);We should see that value in our terminal!

Now we can use that value to interact with the Twitter API.
In order to do that, we could interact directly with the API, or we could use a handy library that makes it easy for us.
We’re going to use the npm library twitter-lite.
Inside of your terminal, we can install it by running:
yarn add twitter-liteOnce complete, you can start back up your development server.
Inside pages/api/twitter/search.js we want to first import that library, so at the top, add:
import Twitter from 'twitter-lite';And now inside our function, under our session and token constants, add:
const client = new Twitter({
  subdomain: 'api',
  consumer_key: process.env.TWITTER_CONSUMER_KEY,
  consumer_secret: process.env.TWITTER_CONSUMER_SECRET,
  access_token_key: token.twitter.accessToken,
  access_token_secret: token.twitter.refreshToken
});
This will create a new client using our existing environment variables along with the Access Token and Refresh Token we’re getting freom our NextAuth.js session which will allow use to make requests directly to Twitter.
So next, inside of our try/catch block, we can add our request:
try {
  const results = await client.get('search/tweets', {
    q: query
  });
  return res.status(200).json({
    status: 'Ok',
    data: results.statuses
  });
} catch(e) {
  ...
Now, if we go back to our application in the browser and try to submit another search, we can see that we now get a list of results right in our UI!
Note: if you’re following along, you’ll notice it pushes all the content around which makes it hard to see. Feel free to update the CSS styles or remove the
containerclass from the Home component’s parent div which will make it easier to see!

Step 4: Composing and posting a Tweet in a serverless function using Twitter Lite
We can take this a step further! Let’s set up a form so someone can compose and post a Tweet from our application.
To start off, we’re going to simply duplicate our existing search endpoint as a lot of what we’re going to be doing is exactly the same.
First, make a copy of pages/api/twitter/search.js and name it pages/api/twitter/tweet.js.
We have 3 main differences between this endpoint and our original:
- We want to change the name
querytostatus - We want to POST to the
statuses/updateendpoint - We want to change our response, as we won’t be returning a list of statuses
So let’s first update the variable we’ll be parsing:
const { status } = body;Then update the request:
const results = await client.post('statuses/update', {
  status
});
And finally update the return statement:
return res.status(200).json({
  status: 'Ok'
});
Because we’re not requesting any data, we don’t need to return anything, we just need to know that the request worked.
Now similar to Step 3, let’s add some UI to test this out.
First, we can add a new form above our Search form:
<form onSubmit={handleOnTweetSubmit}>
  <h2>Tweet</h2>
  <textarea name="status" />
  <button>Tweet</button>
</form>
And to make sure we are actually doing something on form submission, let’s add a function above the component return statement:
async function handleOnTweetSubmit(e) {
  e.preventDefault();

  const formData = new FormData(e.currentTarget);
  const status = formData.get('status');

  const results = await fetch('/api/twitter/tweet', {
    method: 'POST',
    body: JSON.stringify({
      status
    })
  }).then(res => res.json());

  alert('Success!')
}
Note: using the alert function to send a message probably isn’t the best UX, but we’re just using it here to make sure it works!
Once saved, head back over to the app, write a Tweet, and submit the form, and we can see that our Tweet gets posted on our account!

What else can we do?
Add the ability to post media with a Tweet
When posting a Tweet, we can’t simply attach an image or video. Instead, we need to create a new media object through Twitter and attach that to the Tweet.
Learn how to upload media with the Twitter API.
Other Twitter endpoints
The cool thing is we can extend this to really any endpoint available within the Twitter API via Twitter Lite. It gives us a lot of options for what we can do with our applications.
Check out Twitter API v1.1 and the Twitter Lite documentation for more ideas!
Other provider APIs
We can take this concept and use it for other NextAuth.js providers, such as making requests to the GitHub or Spotify APIs.
Check out the available NextAuth.js providers.