How to Programmatically Upload Images to Cloudinary in React & Next.js
Image and asset managers like Cloudinary give you a lot of power in being able to automatically optimize and transform images, but when building an app, you can’t expect each user to upload manually in your dashboard. How can you share that power and give your visitors the ability to upload their own images from your app?
What is Image and Asset management?
The most basic way to manage your images and other media like video is to directly access them from your project, but that limits some of your options for how you can serve and transform those images, which is where an image manager comes in.
Instead, tools like Cloudinary allow you to upload your media to their platform, where you can then serve your images directly from their CDN.
This comes with a lot of additional features, such as automatic image optimization, using modern formats and compression techniques when the browser supports it, and a ton of transformations you can apply to those images including basic things like cropping and resizing to advanced layering and text additions.
If we’re building an application, we can do these things manually as we’re working with and uploading our media, but what if we wanted to give control to our visitors?
Why would we want to allow our visitors to upload images?
There are a lot of use cases for giving your site visitors the ability to upload media beyond trying to be the next big image hosting solution.
That can include simple examples like uploading a profile photo or avatar to more complex examples like an in-browser image editor. You could even be generating new images based on that uploaded media after running it through AI-based transformations!
Regardless, we ultimately need to be able to accept the ability for someone to select an image and upload that image, then either provide that URL to our visitor or store it somewhere to use at a later time.
What are we going to build?
In order to capture a simple example of this workflow, we’re going to use a Next.js starter project to bootstrap a new React application with an image upload form.
We’ll use that form to capture an image after selected, upload it to our Cloudinary account, then display and return the URL right on our page.
In order to follow along you’ll need a free Cloudinary account.
Disclaimer: I work for Cloudinary as a Developer Experience Engineer.
Step 0: Creating a new Next.js app from a demo starter
We’re going to start off with a new Next.js app using a simple file picker that will help us upload our image to Cloudinary.
Inside of your terminal, run:
yarn create next-app my-image-uploader -e https://github.com/colbyfayock/demo-image-upload-starter
# or
npx create-next-app my-image-uploader -e https://github.com/colbyfayock/demo-image-upload-starter
Note: feel free to use a different value than
my-image-uploaderas your project name!
Once installation has finished, you can navigate to that directory and start up your development server:
cd my-image-uploader

yarn dev
# or
npm run dev
And once loaded, you should now be able to open up your new app at http://localhost:3000!

Now before we move on, let’s take a quick peek at our new project.
Particularly, there are four parts of interest here in our pages/index.js file:
- Our form
- The function that fires when the form changes
- The function that fires when the form is submitted
- State to manage our data
Our form is pretty simple, it has a single input, where we’re collecting a file. Along with that we have event handlers that we have set up as functions.
Those functions start with an onChange handler. When our input changes, we want to read the file that was added so that we can show it in the UI. This isn’t critical to our workflow, but it’s nice for someone to see what they’re uploading before they upload it.
Additionally we have a function fire using the onSubmit handler. Once we’re ready to upload, we want to send our image up to wherever we’re uploading it, which in our case will be Cloudinary.
And finally our state will be used to keep track of our data as it moves along in our app’s workflow. When we get our image, we’ll store it there to display in the UI and when we’re ready to upload, we’ll collect the response data to use that in our app.
But now that we have a basic understanding, let’s dig in!
Step 1: Setting up an Upload Preset for unsigned Cloudinary uploads
When uploading to Cloudinary, we have two different methods for how we can upload media: signed and unsigned.
By signing our requests, we can make sure that anything that’s uploaded is authenticated and we can be sure they have the right permission to make that upload request.
On the other hand, we can use unsigned requests, which will allow us to give a wider range of access for those who are trying to use our site to upload an image.
For our walkthrough, we’ll use unsigned requests, but the trick is, we need to first configure an Upload Preset, which tells Cloudinary how we want to handle any uploads associated with that particular preset.
To create our Upload Preset, let’s first head over to our Cloudinary dashboard and navigate to the Settings section using the little cog in the top navigation bar.
Once there, we’ll want to select the Upload tab.

If we scroll down on this page, we should come to a section that shows Upload presets. We can also see that by default, we already have a preset defined!
While we could simply use and modify the existing preset, let’s create a new one by selecting Add upload preset.

While our new page has a bunch of settings we can configure, we’re going to focus on three:
- Name
- Signing Mode
- Folder
For our Name, this can really be whatever you want. I’m going to call mine “my-uploads”.
For the Signing Mode, because we’re using Unsigned Uploads, we’ll want to select Unsigned.
As for the Folder, using a folder is optional, but I highly recommend using one, especially when testing things out, which gives you an easy way to organize your uploads and clean things up if you decide to start over. I’m going to name my folder “My Uploads”.
You can leave the rest as the default setting or you can configure them to your liking, but either way, once you’re done, hit the big orange Save button at the top.
Once saved, you should be redirected to your Upload Settings page, where we should now see our new preset.

With our new preset, we can now upload our media to Cloudinary!
Step 2: Uploading an unsigned image to Cloudinary by URL
Now that we’re diving into the code, let’s open up our pages/index.js file and scroll down to the handleOnSubmit function.
When someone uploads a file and hits submit, we want to take that file and upload it to Cloudinary.
To do this, we need to first collect our image from the form itself, particularly our filepicker input.
Inside of the handleOnSubmit function, add the following:
const form = event.currentTarget;
const fileInput = Array.from(form.elements).find(({ name }) => name === 'file');
Starting off, the event that’s passed in as an argument includes a currentTarget property which refers to our form that was submitted.
Once we have our form, we can further grab all of the inputs and generally all of the elements of the form using form.elements.
That list of elements however is a Node List, where we can’t use convient methods like Array.find, so we first convert that List into an Array using Array.from then use find to look for the element that has a name of file which is the name assigned to the input in our form.
When fired, fileInput should reference our filepicker input that our visitor used to select an image.
We can test this out by adding a console.log:
console.log('fileInput', fileInput);And then trying to click Upload after selecting an image in the browser!

Next, we want to look for all of the files associated with that input, which we can find using the files property on our input. We can again test this out by adding a console.log:
console.log('fileInput.files', fileInput.files);But now, we want to collect all of those files and turn them into FormData, which is what we’ll use to upload our image to Cloudinary.
Add the following to the handleOnSubmit function:
const formData = new FormData();

for ( const file of fileInput.files ) {
  formData.append('file', file);
}
Here we’re creating a new instance of FormData, where we’re then looping through all of the files associated with our input (which will be only one in our case) and appending that file data to our FormData instance.
Before we send our data up, we have one more thing, and that’s associating our Upload Preset with our form.
After our file loop, add:
formData.append('upload_preset', 'my-uploads');Note: Remember to replace
my-uploadswith whatever name you gave your Upload Preset in Cloudinary.
Now we’re ready to upload! So next, we can use the Cloudinary API upload endpoint with fetch by adding:
const data = await fetch('https://api.cloudinary.com/v1_1/[Your Cloud Name]/image/upload', {
  method: 'POST',
  body: formData
}).then(r => r.json());
Note: inside of the Cloudinary URL above, be sure to replace
Your Cloud Namewith your Cloudinary account’s Cloud Name which you can find right in the dashboard.
Here, we’re sending a POST request to the Cloudinary API where we’re passing in our instance of FormData as the body.
Once the request finishes, it transforms that data to JSON, where it then stores itself inside of the data constant.
While we’re not doing anything with the UI yet, we can see this working by trying to click Upload and watching our network requests.
If we open up the response, we can even see the URL for our new upload!
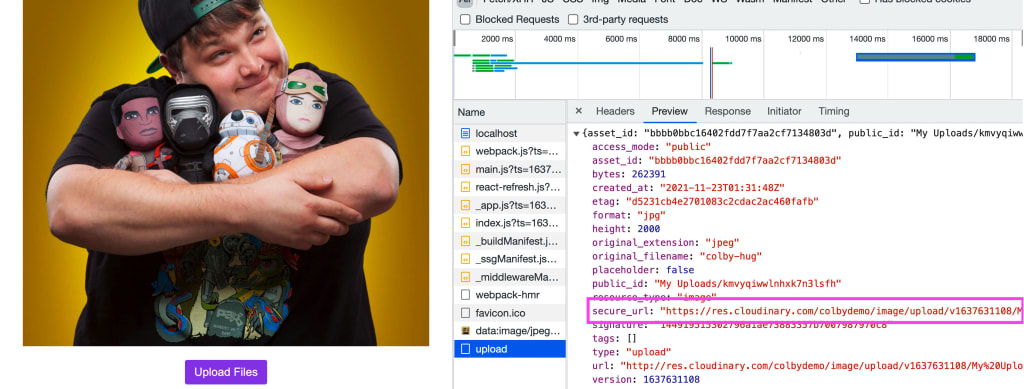
Finally, let’s make sure we update the UI with our new image.
After our request, add:
setImageSrc(data.secure_url);
setUploadData(data);
Which will replace the image in the UI with the Cloudinary URL and display all of the data from the response right on the page!
Step 3: Applying Incoming Transformations when uploading an image to Cloudinary
When uploading directly to Cloudinary, we get a few options for how we manage those uploads. One in particular, is applying a transformation to our asset upon upload.
While you likely want to save the raw, high quality version of that image and apply the transformations on the fly (that way you can make changes later), maybe you want to prevent saving files that are way too big that take up a ton of space or some kind of specific transformation for your application’s needs.
For example, say I want to collect awesome pictures of space and I find this cool X-ray based image of another galaxy.

But the raw image is 3600×3600 with a file size of 1.4MB!
That’s way more pixels than I need and when considering many more people uploading images that size or larger, that’s going to quickly eat up my storage.
Instead, I can use an Incoming Transformation to both resize that image to a more reasonable size and optimize that image in a way that won’t negatively impact the quality.
To do this we’ll head back to the Cloudinary console where we’ll update our Upload Preset to apply that transformation.
Note: when using signed uploads, you also have the option of including your Incoming Transformations via the SDK!
Head back to your Upload settings and click Edit next to your Upload Preset from Step 1.
Then, select Upload Manipulations from the left sidebar.

Next, we should see a section titled Incoming Transformations. Click Edit below that title where we should now get a modal where we can configure our transformation.
I’m going to apply two transformations to mine:
- Resize to a width of 2000px
- Set the Format quality to be Automatic – Best Quality
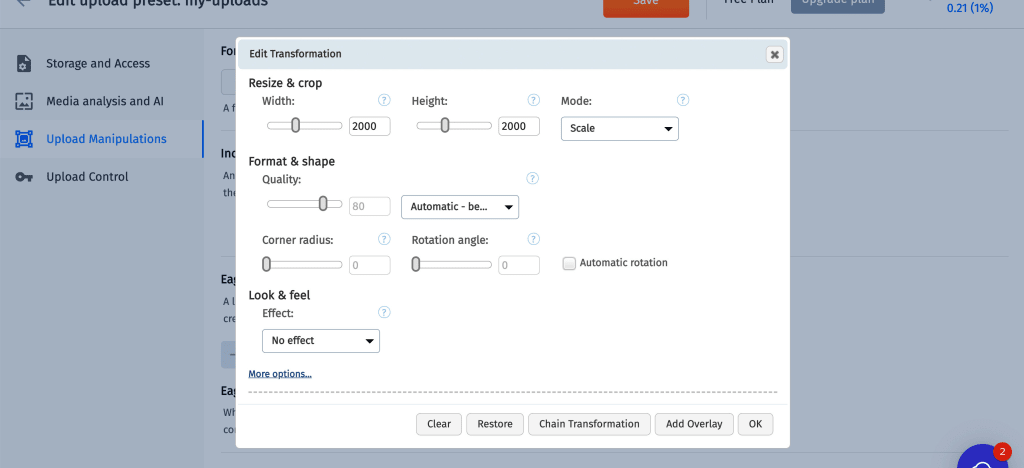
Once ready, hit OK and we should now see our transformations listed as in the UI!
Now head back to the application, select an image, and hit upload.
Note: if you’re using a resize transformation, make sure you’re uploading an image larger than that size to see it properly transformed.
Once successfully uploaded, we we’ll get our new URL, but we’ll also see that our file was transformed to our settings!

What else can we do?
Adding more transformations in the browser
We only looked at what transformations we can apply before our image is stored, but most of the fun and interesting transformations happen after the image is stored when we’re trying to use it in our app.
Transformations like face detection help us make sure when cropping images, we’re doing so intelligently to create the best experience we can.
Learn how to apply transformations to create a thumbnail gallery.
Pregenerating transformations with Eager Transformations
When our images are loaded using URL-based transformations, Cloudinary will go and process that image on the fly, which when first requested, might take a little extra time before getting cached in the CDN.
If we want to make sure none of our users have to wait for that transformation, we can use Eager Transformations to make sure those are processed after we upload.