How to Trigger a Function when Scrolling to an Element in React Intersection Observer
Whether we’re trying to delay loading heavy resources or trying to add some delight to our app experience, being able to trigger functionality after a visitor scrolls to a certain point is handy tool in our belt. But what do you track and how do you track it?
How can we detect if someone scrolled to an element?
We have a few options for how we can approach this, such as adding an event listener that fires a function any time someone scrolls.
window.addEventListener('scroll', () => {
  console.log('????');
});
But that alone doesn’t give us a lot to work with, still needing a way to figure out where on the page we’re at, and it can end up eating precious resources without complicated throttling or debouncing solutions.
Instead, we can use the Intersection Observer API which will give us precisely the information we need about an element as soon as the browser hits that element.
How do we use the Intersection Observer API?
Let’s start off with a basic example.
const observer = new IntersectionObserver(function (entries, observer) {
  entries.forEach((entry) => {
    if ( entry.isVisible ) {
      console.log('????');
    }}
  });
});

observer.observe(document.querySelector('.my-element'));
Here we’re setting up a function that fires whenever .my-element is scrolled into view.
In reality, we actually get an event when it first fires letting us know if it’s in view, then as soon as it goes into view (if not already), and when it goes back out of view.
This includes information like just simply is it visible or the exact details of where it’s located on the page, which gives us a lot of options for managing our event.
What are we going to build?
To see how this actually works in practice, we’re going to spin up a new application using a demo starter I created where we’ll trigger some functionality whenever we scroll to a particular element.
We’ll first see how we can do this manually by using the Intersection Observer API directly, then we’ll see how we can make that process easier by using a React hook that we can find over on npm.
We’ll first simply update page state then we’ll add a fun example of triggering an animation on scroll.
Step 0: Creating a new Next.js app from a demo starter
We’re going to start off with a new Next.js app using a starter that includes a simple upload form that reads the image and places it on the page.
Inside of your terminal, run:
yarn create next-app my-scrolly-event -e https://github.com/colbyfayock/demo-landing-starter
# or
npx create-next-app my-scrolly-event -e https://github.com/colbyfayock/demo-landing-starter
Note: feel free to use a different value than
my-scrolly-eventas your project name!
Once installation has finished, you can navigate to that directory and start up your development server:
cd my-scrolly-event

yarn dev
# or
npm run dev
And once loaded, you should now be able to open up your new app at http://localhost:3000!

Before we dive in, feel free to get comfortable with the code.
There isn’t a whole lot special going on, it’s mainly static content in our homepage src/pages/index.js which is where we’ll work for our walkthrough!
Step 1: Accessing a DOM node Ref in React with useRef and useEffect
For our first example, we’re going to trigger a state change whenever someone scrolls down to the heading “Have you scrolled down here yet?”.
Right now, the page just says “IDK”, but we can be smart about that and actually described whether or not someone has scrolled down there.
When using React, we let React control what elements in the DOM get updated and generally manage interactions with it.
While we could technically access the DOM directly every time by using tools like querySelector, we’re breaking outside of that box of React managing things for us which can lead to unexpected results.
So instead, we can use Refs with the useRef hook which gives us a way to access those same elements in a React way.
To get started we need to first import the useRef hook.
At the top of src/pages/index.js add:
import { useRef } from 'react';Next we’re going to define our Ref.
At the top of the Home component before the return statement add:
const myRef = useRef();We then want to apply our Ref to the DOM element we want to listen on.
In that section, we have custom Section and Container components, which because they’re not forwarding refs (not important for now), we can’t use them, but because we’re using a standard h2, we can add it directly to that.
Tip: custom components don’t automatically “forward” refs meaning React doesn’t know what DOM element to apply them to. This isn’t important for our walkthrough, but to learn more, check out Forwarding Refs on the React docs.
So let’s update our h2 to:
<h2 ref={myRef} className={styles.heading}>
  Have you scrolled down here yet? ????
</h2>
Now that we’ve defined our Ref, we can try to access it.
We’ll do this by using the useEffect hook which runs in the browser after the component renders, meaning, we’ll then have access to the DOM.
First let’s import useEffect at the top by adding it to our existing import statement:
import { useRef, useEffect } from 'react';Then right under our myRef definition, let’s add:
useEffect(() => {
  console.log('myRef', myRef.current);
}, []);
If we now open our browser and reload the page, we should see in our web console our element being logged!

Tip: If you notice in our log statement we’re using
.current. When react uses the property to store the “current” version of the DOM node, to make sure that we’re correctly accessing the right version every time.
But now that we can access our element as a Ref, we can further start to use native browser APIs to interact with that element, which we’ll do in the next step with Intersection Observer!
Step 2: Using Intersection Observer to detect when an HTML element is in view
With our Ref attached to our H2, we can now use browser APIs like Intersection Observer to detect whenever that element is scrolled to.
To start, we need to first create an observer instance.
Inside of our existing useEffect hook, add:
useEffect(() => {
  const observer = new IntersectionObserver();
}, []);
In order to trigger a function any time our element is visible, we need to pass a function as the first argument of IntersectionObserver.
Update our observer instance to:
const observer = new IntersectionObserver((entries) => {

});
Any time that function runs, we’re going to receive an entries argument which is a list of all of the elements that triggered our active observer (in our case it will be 1).
Since we’re currently only working with a single element, we really don’t need to work with a list of elements, so we can access the 0 index of the list of elements and use it to check if it’s visible.
const observer = new IntersectionObserver((entries, observer) => {
  const entry = entries[0];
  console.log('entry', entry);
  console.log('entry.isIntersecting', entry.isIntersecting);
});
But we’re not currently “observing” anything, meaning, we never told the API what element we want to watch. If we try to run this in the browser, it won’t do anything.
To make sure we’re actually observing our element, add teh following after the observer constant:
observer.observe(myRef.current);We’re using our Ref to pass in a reference to our HTML element to tell our observer which element to watch.
But now if we reload the page, we can see right away that it’s working!
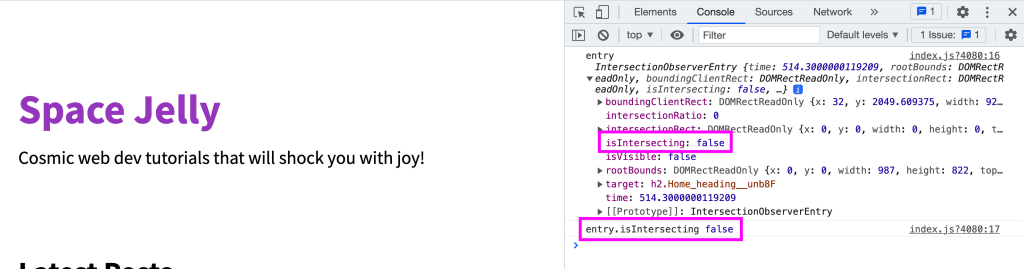
If you’re at the top of the page like I am, we can see that our isIntersecting value is false which should be expected because well, it’s not in our viewport yet.
But if we scroll down to our element, we can see we get another log statement with the updated value!

Tip: if you’re wondering why wouldn’t we use the
isVisibleproperty, that will only work if you’re explicitly tracking visibility (TIL) which additionally will check if the element is truly visible on the page. That adds more load to the observer though so only enable it if you need it.
Next we’ll store that value in state and update the page once it’s in view.
Step 3: Storing visibility status of an element with useState
While we have access to if something is visible, we don’t really have a way to tell React that elements visible.
If we want to update something on the page, we need to set up an instance of state to store that information.
We’ll use the useState hook which will let us easily store and access that value.
At the top of the file, we need to update our import statement again with:
import { useRef, useEffect, useState } from 'react';Next we need to set up an instance of that state to track the visibility.
At the top of the Home component before the return statement add:
const [myElementIsVisible, updateMyElementIsVisible] = useState();Tip: I’m using long names to make sure what we’re doing is clear, but be sure to update these names to something that makes sense for your project!
Whenever our observer is triggered, we can then update that state.
const observer = new IntersectionObserver((entries, observer) => {
  const entry = entries[0];
  updateMyElementIsVisible(entry.isIntersecting);
});
And finally, now that we have our state value, let’s use it!
Below our H2 where we added our myRef prop, let’s update the paragraph to:
<p>{ myElementIsVisible ? 'Yes! ????' : 'No ????' }</p>Once we scroll to that element, we’ll see that it shows “yes”!

Now, how can we prove that this is actually working? As soon as we scroll to it, it changes.
We can use the DevTools to inspect our element while we’re at the top of the page.
The easiest way to do this is to right-click the element, click inspect, then scroll to the top of the page.
But once we’re there, we can see that it updates to “no” when it’s not visible!

Step 4: Using the React Intersection Observer hook to detect visibility
The code we added to track visibility isn’t really that much, but sometimes we want to get some of that code out of the way and use something that’s easier to add and takes other things into consideration like performance optimizations.
So instead of manually setting up an Observer, we can use the React Intersection Observer hook.
To get started, first let’s install the dependency:
yarn add react-intersection-observer
# or
npm install react-intersection-observer
Next we need to import that into our file.
At the top of src/pages/index.js add:
import { useInView } from 'react-intersection-observer';Now, our hook is going to replace most of our existing code, including the ref we defined. The hook sets up these things internally making it easy for us to track.
Tip: you can also remove the
useRef,useEffect, anduseStateimports if you’re not using them elsewhere.
To make this easy to replace, we can also rename some of the returned values, that way it matches what we’re already using from the previous steps.
So let’s replace everything at the top of the Home component before the return statement with:
const { ref: myRef, inView: myElementIsVisible } = useInView();But now if we scroll down to our section, we’ll see just like before, it shows that it’s visible!
We can even inspect the element like before and see that it updates to “No” when not in view.
And finally in the next step, we’ll learn how we can set up a simple animation to trigger with our useInView hook!
Step 5: Triggering a CSS animation when an element is in view
To see how we can add some animation and delight, we can trigger a CSS animation any time someone scrolls to our element.
We’ll handle this by adding a class to our element whenever it’s in view which has an animation associated with it.
Starting off, let’s update our HTML a bit to make this work.
Under the “Magic ????” header, update the rocket to:
<p>
  <span className={styles.rocket}>????</span>
</p>
Then, let’s add some CSS to make our element act like a block level element, which let’s us use certain CSS properties effectively.
Inside src/styles/Home.module.scss add:
.rocket {
  display: inline-block;
}
At this point, nothing should be different if you reload the page, but now let’s add some interaction.
First, we need to define a new handler to detect that this particular section is in view.
Like we did in the previous step, let’s use the React Intersection Observer hook to set this up.
At the top of the Home component before the return statement add:
const { ref: magicSectionRef, inView: magicSectionIsVisible } = useInView();Like before, we need to apply our Ref as a prop, so update the H2 with “Magic” inside to:
<h2 ref={magicSectionRef} className={styles.heading}>
  Magic ????
</h2>
We need to be able to dynamically add a class to our rocket element any time this section is visible. We can do this by using the magicSectionIsVisible variable with our className prop.
Update the rocket Span to:
<span className={`${styles.rocket} ${magicSectionIsVisible ? styles.animateRocket : ''}`}>
  ????
</span>
Here we’re saying that we always want the .rocket class, but we only want to add the .animateRocket class if it’s visible.
Finally, let’s add our animation CSS.
Inside of src/pages/Home.module.scss add:
.animateRocket {
  animation-duration: 5s;
  animation-name: animate-rocket;
}

@keyframes animate-rocket {
  0% {
    transform: scale(1) rotate(10deg);
  }
  5% {
    transform: scale(1.25) rotate(-15deg);
  }
  10% {
    transform: scale(1.5) rotate(5deg);
  }
  15% {
    transform: scale(1.75) rotate(-10deg);
  }
  20% {
    transform: scale(2) rotate(0);
  }
  100% {
    transform: scale(20) translate3D(100vw, -100vh, 0) rotate(0);
  }
}
We’re using CSS animations along with a set of defined keyframes to scale and move around our rocket.
If we reload the page and scroll down to our “Magic” section, we’ll see that our rocket gets ready and takes off!

What else can we do?
Level up your animations with Framer Motion
Framer Motion is an amazing library for being able to easily set up animations for the web. Mix this concept of stateful animations and use Framer to work it’s magic.
Check out How to Use Framer Motion to Add Animations and Page Transitions to a Next.js React App on YouTube.
Use Intersection Observer to “lazy load” features
Whether it’s large media or a YouTube embed, trying to load those in the browser take up a lot of resources, especially when trying to do it as soon as the page loads.
Try using Intersection Observer to only load those items when someone scrolls down to make things a bit more performant.
Learn more about browser event listners
We can similarly use Refs for other browser event listener use cases such as listening for keyboard events for navigating search results.
Learn how with How to Use Browser Event Listeners in React for Search and Autocomplete.